Connecting to an LDAP Directory Server
LDAP (Lightweight Directory Access Protocol) is a protocol that allows applications to retrieve data about users from an LDAP server. You can connect AppSpider Enterprise to your LDAP server for authentication, which will enable you to use an LDAP directory to give access to your users.
There are a couple of ways for you to set up LDAP for AppSpider Enterprise:
During installation - The AppSpider Enterprise installer includes options for you to set up LDAP. You'll need to provide the LDAP server address, the credentials to authenticate to the server, and the base DN.
Post installation - If you did not connect your LDAP server to AppSpider Enterprise during the installation process, don't worry. You'll be able to set up LDAP post-installation by modifying the NTOE configuration file.
Please remember that you will only be able to login using your LDAP credentials after you connect AppSpider Enterprise to your LDAP server. You will not be able to log in using your local accounts.
Connecting your LDAP server during installation
The easiest way to connect to an LDAP server is to do it when you install AppSpider Enterprise. The installer provides a guided interface that asks you for the information that is needed to set up AppSpider Enterprise, including the information needed to connect AppSpider Enterprise to either Active Directory or an LDAP e-directory.
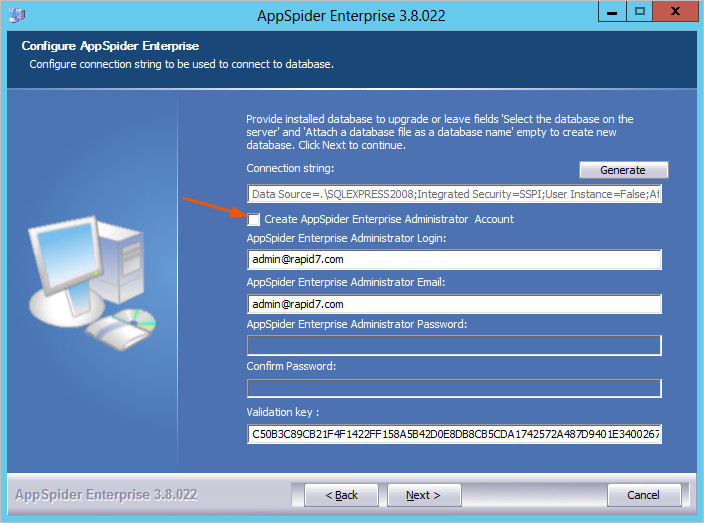
Before you can connect AppSpider Enterprise to your LDAP server, you'll need to specify where you want to install your source files, store your data files, and provide the information to connect to your database. After you provide these details, you'll be able to add the information for your LDAP server.
If you plan to use LDAP for authentication, you don't need to set up an AppSpider Enterprise administrator account. AppSpider Enterprise will use Active Directory or eDirectory as an authentication source. When you get to the database connections, do not select the Create AppSpider Enterprise Administrator Account option.
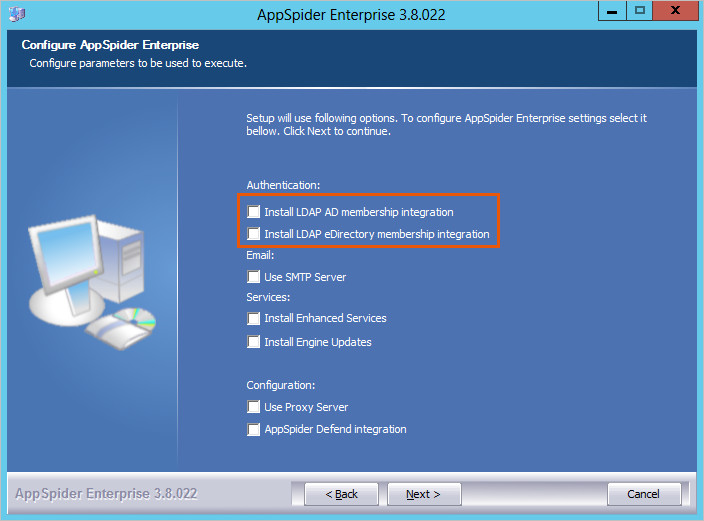
To configure LDAP during installation, you'll need to select either the Install LDAP AD membership integration option or the Install LDAP eDirectory membership integration option on the "Configure AppSpider Enterprise" screen. Choose the option that matches your authentication needs.
On the following screens after you set up the database connection, you'll need to provide the information for Active Directory or LDAP eDirectory.
The first LDAP configuration screen lets you set up the connection details for your LDAP server.
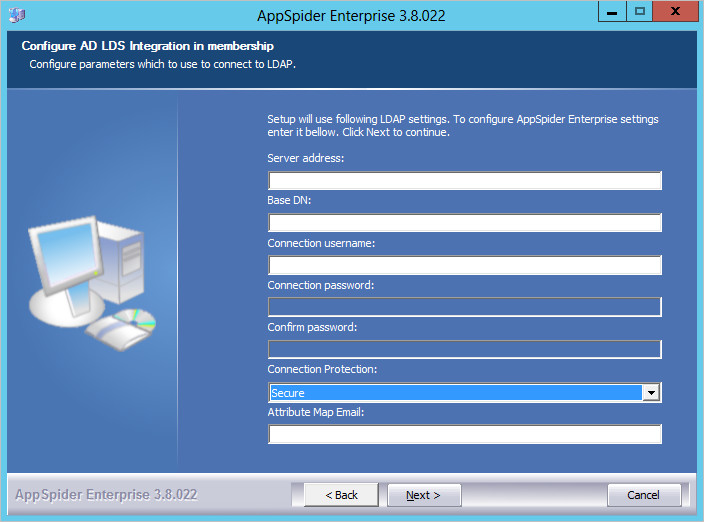
You will need to provide the following information:
Server address - The fully qualified domain name or the IP address of your LDAP server. The address must include the port that LDAP runs on. For example,
192.168.1.0:389is an example of a valid format for the server address.Base DN - The base DN refers to the level in the directory information tree where an LDAP client will start its search for users. An example of a base DN is
dc=example,dc=com.Connection username and password - The account you choose should have access to Active Directory or eDirectory with search permissions. This allows AppSpider Enterprise to connect to the server and search by username.
Connection protection - You can specify whether the connection is secure. Generally, a secure connection, uses port 636 for SSL. Non-SSL connections use port 389.
Attribute map email - The attribute map email is the LDAP attribute that contains a user's primary e-mail. The default for this attribute is "mail".
The next screen asks you to set up an account for the system administrator.
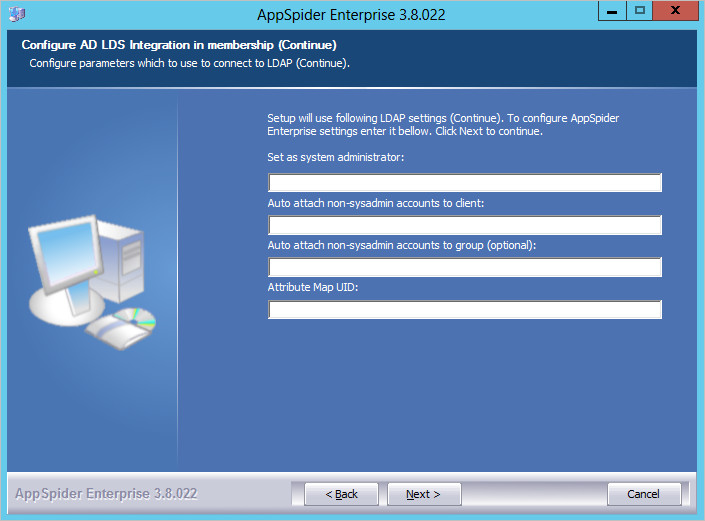
You'll need to provide the following information:
System administrator - This option identifies the LDAP user name who you want to assign system administrator privileges. You can only specify one user name for this option. To add additional system administrators, you can read Adding Multiple System Administrators.
Account client name - This is option identifies the client that you want to assign to the LDAP user. In case you need a refresher, the client is a collection of users who interact with AppSpider Enterprise; it sets bounds on who can use the application. For example, if you want to use the default client, you can enter "webscantest" for this option. After you set the client for a user, you cannot change it.
Account group name - This option specifies the name of the AppSpider Enterprise group that can log in to AppSpider Enterprise to manage access to the application.
Attribute map UID - The attribute map UID allows you to specify a login name that supports clients and servers from previous versions of Windows, such as Windows NT 4.0, Windows 95, Windows 98, and LAN Manager. The default attribute map UID is
sAMAccountName.
After you configure your LDAP settings, you can continue with the rest of the installation.
Configuring LDAP after AppSpider Enterprise has been installed
If you have already installed AppSpider Enterprise and you want to use LDAP for authentication, you'll need to modify the NTOE configuration file and add the information for your LDAP directory. There are two versions of the NTOE configuration file that need to be modified. They are located in the following directories:
C:\Program Files(x86)\Rapid7\AppSpider Enterprise 3.x\IIS.NET\binC:\Program Files(x86)\Rapid7\AppSpider Enterprise 3.x\AppSpiderScheduler2
You'll need to replace "3.x" in the file path with the version of AppSpider Enterprise you are running.
To configure LDAP for AppSpider Enterprise:
Open
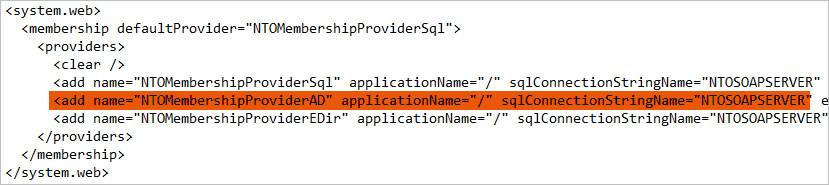
C:\Program Files(x86)\Rapid7\AppSpider Enterprise 3.x\IIS.NET\bin\NTOE.configwith a text editor. You may need to have administrator privileges to edit the file.Find the
system.webelement.Within that element, find the line that starts with <add name="NTOMembershipProviderAD">.
- Provide the information for the following options:
autoAttachAccountClientName - This is option identifies the client that you want to assign to the LDAP user. In case you need a refresher, the client is a collection of users who interact with AppSpider Enterprise; it sets bounds on who can use the application. For example, if you want to use the default client, you can enter "webscantest" for this option. After you set the client for a user, you cannot change it.
autoAttachAccountGroupName - If a user creates a new group in AppSpider with some set permissions , new users who have access to and login with AD creds into Appspider for the first time, will be auto attached to this group with the permissions defined in it.
autoAttachAsSysAdmin - This option identifies the LDAP user name who you want to assign system administrator privileges. You can only specify one user name for this option. To add additional system administrators, you can read Adding Multiple System Administrators.
ldapServer - This option identifies the LDAP server that you want to use. The host name must be either the fully qualified domain name or IP address of your LDAP server and include the port that LDAP runs on. An example of the LDAP server address would be
my.server.com:389.ldapUser - This option specifies the LDAP username that has the permissions to attach LDAP.
ldapPassword - This option specifies the password for the username you specified for
ldapUser. You can generate the encrypted password using theNTO.Enterprise.Tools.PasswordEncrypter.exeutility found in the installation path, i.e:C:\Program Files (x86)\Rapid 7\AppSpider Enterprise 3.8\IIS.NET\binldapBase - This option specifies the base dn from where to start searching for users, i.e: CN=Users,DC=example,DC=com.
ldapSSL - This option specifies whether communication with the LDAP environment is over SSL. Valid values are
TrueorFalse.ldapAllwaysTrustCertificate - This option specifies whether to skip validation of the certificate from LDAP. Valid values are
TrueorFalse.ldapUIDAttribute - This option specifies the mapping for the user login with an LDAP attribute. i.e:
sAMAccountName.ldapEmailAttribute - This option specifies the mapping for user login email with an LDAP attribute. i.e:
mail. You can generate the encrypted password using theNTO.Enterprise.Tools.PasswordEncrypter.exeutility found in the installation path, i.e:C:\Program Files (x86)\Rapid 7\AppSpider Enterprise 3.8\IIS.NET\bin
Save the file.
Repeat these steps again for C:\Program Files(x86)\Rapid7\AppSpider Enterprise 3.X\AppSpiderScheduler2\NTOE.config.
Adding client accounts via LDAP
Everyone working with AppSpider needs to have an account, which determines the level of access they have to certain areas of the application and types of things they can do. There are two account types that you can add for AppSpider Enterprise:
System Administrator Account - A system administrator account has control over the set up and configuration of the system and client accounts. This account type is not mapped to a client and can create different groups to assign users, rights, or roles. A system administrator can manage the users, groups, and configurations for each client.
Client Account - A client account is created by a system administrator to help separate rights and configurations. Each account is mapped to a client, which makes it possible to easily integrate with third party systems.
Adding a client account
If you are using LDAP for authentication, you cannot add a user account through the AppSpider Enterprise user interface. Instead, the user should log in to AppSpider Enterprise with their LDAP credentials. After they log in, their account will be mapped to the client and group that you specified for LDAP.
Adding multiple system administrator accounts
Adding a system administrator is a multi-step process that requires you to:
Verify all users with system administrator accounts have logged in to AppSpider Enterprise at least once. After they log in, their account is mapped as a system administrator account. You can only add another system administrator account after this mapping has occurred.
Modify the NTOE configuration files to add another system administrator.
Use the newly added system administrator account to log in to AppSpider Enterprise.
Repeat this process to add additional system administrators.
Now that you're familiar with the prerequisites, let's take a closer look at how you'd add another system administrator:
Open
C:\Program Files(x86)\Rapid7\AppSpider Enterprise 3.x\IIS.NET\bin\NTOE.configwith a text editor. You may need to have administrator privileges to edit the file.Find the
system.webelement.Within that element, find the line that starts with "<add name="NTOMembershipProviderAD">.
- Find the option autoAttachAsSysAdmin.

- Replace the username that is currently specified for autoAttachAsSysAdmin with the username you want to add as system administrator.

Save your changes.
Repeat these steps again for
C:\Program Files(x86)\Rapid7\AppSpider Enterprise 3.X\AppSpiderScheduler2\NTOE.config.After you have modified both NTOE configuration files, you'll need to log in to AppSpider Enterprise with the system administrator account you've just added.
If the user already exists in AppSpider Enterprise as a client, they cannot be added as a system administrator. Check the clients to see if the account already exists and delete the user if they exist in AppSpider Enterprise. To view a list of clients, go to System > Clients in the AppSpider Enterprise user interface.
After you delete them, you can add their account information to the NTOE configuration file.